Just when you thought you were done hearing and seeing anything Christmas related, I am here to mention it one last time (for awhile anyway). I received some Christmas decoration storage questions on a previous post, in my email, and on Instagram, so I thought I would quickly share how I organized our Christmas decorations as I was packing things up this year.
Our system is nothing fancy or even too revolutionary or exciting. But I did make some changes this year that I have already found helpful and beneficial.
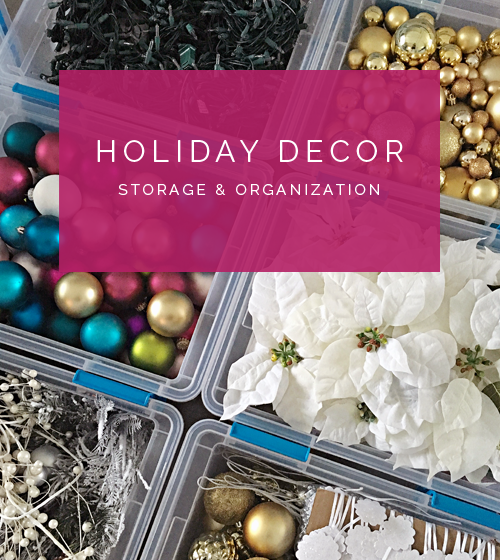
TIP ONE: SELECT STORAGE THAT FITS YOUR SPACE
The first thing I did this time around was invest in some new storage bins. This is something I have been wanting to do for years, but continued to make excuses and put if off because it was a bit of an investment. At the end of 2014 we organized our storage room, and the previous Christmas storage bins were too big to properly fit the shelving (causing them to occasionally become stuck between the shelves). I told myself they were fine, but would secretly curse under my breath whenever I needed to access them. With the previous bins, we were only able to store one large bin per shelf while leaving some awkward space to fill on the shelf beside the bin. The new bins allow us to place two side by side, and because they are not as tall, we were able to add an extra shelf to our shelving unit. Even though there are now more bins involved, the dimensions made much more sense for our storage space and left us with room to spare.

The smaller bins also allowed me to better categorize the items inside. This year when I opened our over-sized Rubbermaid bins, I was instantly overwhelmed. The contents were not all that organized and my labels on the front were far too vague to be of much help. There were things hiding in the far bottoms of the bins that were lucky to be found. So not only do these new bins fit our shelves better and allow me to better divide our decor, the last big bonus is that I can see the contents. This is something that I thought I would really dislike, because it can seem a bit visually cluttered on open shelving, but I admit it is so much better when trying to track down something quickly.
I did decide to keep one large bin to hold my six wreaths and the coffee filter garland I recently made.

That garland is HUGE! The good thing is that even if it gets a little squashed in the bin, it bounces back nicely.
TIP TWO: CREATE BIN CATEGORIES THAT MAKE SENSE
I did my best to sort the bins by categories that fit together. Garland was stored in two bins, ribbon and tree embellishments were in another bin, bulb ornaments were in their own bins…

I had a few bins where categories overlapped, but keeping items as divided as possible will keep things easier to find.
TIP THREE: SHOP YOUR HOME
There were a few occasions when I was handling items that were a little awkward and bulky, and I didn’t have anything specific on hand to keep them corralled. And in no way did I want to go out in the cold at 9:00 at night to shop for proper light and garland storage.

I found myself reaching for food storage bags more than anything else while organizing our Christmas decor. Not only did they allow me really break down my categories more, they also saved a lot of space inside of the bins by giving them a “vacuum sealed” effect. By pressing out all of the air in the bags, I was able to flatten our ribbon, stockings and tree skirts to better fit the space available inside the bins.

They also keep all of those smaller pieces sorted and organized; such as ornament hooks, small beaded garland, spare bulbs and light clips.

Although the food storage bags were the biggest winners, I also cut up some cardboard to hold the stringy garland and used hair ties to keep the string lights bundled.


TIP FOUR: PICK YOUR STORAGE BATTLES
There are so many (expensive) products on the market specific for organizing and storing your Christmas decorations. And believe me, the storage loving gal I am could have gone crazy. The bins I purchased were about as basic as can be, yet still allowed me to utilize other (also basic) options for dividing the items inside. I even ditched our wreath box this year because it was awkward to store and majority of my wreaths never fit it properly to begin with. Selecting generic storage pieces allow for versatility down the road.

When it comes to all of the bulbs, majority of ours are the shatterproof versions. Even the glass options are a dime a dozen at Hobby Lobby after sales and coupons. They do not carry a lot of sentimental value, so I am OK (carefully) storing them loosely inside of the bins. I did make sure to keep the glass versions separate, and also labeled that bin accordingly to be sure others know to handle that specific bin with extra care.

However, when it comes to the ornaments that do have special meaning because they were created with love by our kids or we have received them from our friends and family, I did purchase a soft divided storage container (I purchased ours from Amazon for $18 but the price has since significantly increased so it may be worth shopping around).

We like to take time the week of Christmas to place all of our cherished ornaments on the tree, talking about each one. I divided some of them into specific slots based on type; children’s first ornaments, family favorites, gifted ornaments, handmade ornaments, etc… I also like that the bin is deep enough to allow some of the ornaments to hang from their hooks, while others have plenty of room to stack.

You can take protecting your ornaments a step further by wrapping them in tissue paper or newspaper as well.
TIP FIVE: LABEL, LABEL, LABEL
Organizing 101 stuff right here, but it really does help! When my labels were vague, I was rummaging through multiple dark “Holiday Decor” bins to find our Christmas books and Santa hats. Although our bins are now clear, it can still be challenging to tell where one thing stops and another begins.

This time around I was extremely specific when indicating the bin contents, and I am sure I will be thanking myself next year for taking a few extra minutes to complete this simple task.

You can download blank labels for free here, they are the same labels I have been using in our storage room for all of our bins. I love to pair them with clear I.D. badge holders I found at Staples.

So those are the tips that helped me this year, and a peek inside of our new happy holiday bins. You can find additional Christmas storage tricks in this oldie post of mine here.
I am already covered in paint and taking on my next organizing project, I can’t wait to finish it up and share it with you soon! Happy organized 2016 everyone!
from IHeart Organizing http://www.iheartorganizing.com/2016/01/holiday-decor-storage-organization-tips.html
No comments:
Post a Comment