The weekend just flew by at Superman speed, but I still managed to finish up my next organizing project of the year!
I have been on a roll doing general decluttering of every closet and drawer I can get my hands on. Just quick 10-15 minute cleaning sessions that allow me to sort through items that have fallen victim to our “stash and dash” tendencies.
Majority of the organizing that I am doing this month is as basic as it can be; open drawer or closet/cabinet door, remove items that don’t belong, give everything a quick cleaning, close drawer or closet/cabinet door. But the linen closet was a different type of organizing project. It was one that required more attention, thought, storage and care. It was also a closet that has been driving the entire family crazy for quite some time now, but not anymore!

Our linen closet is located in our main hallway near three bedrooms and a bathroom. However, it really has never had the actual purpose of housing linens. Given the odd shelving placement, it really only offered us storage for our medications and first aid supplies.

Over time, we would try to force some linen storage inside of the cabinet, but the setup just wasn’t quite right. We do have room in our guest bathroom and bedroom to store the majority of our guest linens (and sheets for each bedroom are stored within that specific room), however, the primary bathroom is very limited in storage and we found ourselves wishing we had a close option for some of our overflow. While I was working on this closet, I also decided to add a couple of things that will help our day-to-day routine run a bit smoother as well.
Previously, the closet consisted of three wire shelves and a hamper for laundry. Check out all of that unused space between the hamper and first shelf!

The photography angles in this post are a bit strange given the layout of our hallway and the fact I had very little room to step back with my lens.
After we put the floors in, we still needed to cut a few pieces of trim for the closet, but decided to wait because I knew I would be painting it eventually and I didn’t want to worry about messing up new trim. The walls inside of the closet were still only a white primer from when we built over 14 years ago.

With a closet to-do list and a plan, I emptied the closet of all of the belongings and shelving. I then puttied the holes and prepped the closet for paint. Quick tip: I realized I was out of spackle when it came time to fill the holes, and I was painting after hardware store closing hours. Womp womp! So I made my own filler from white school glue and baking soda. It worked beautifully!
Thanks to the power of the internet, the closet was now empty, painted and shelving installation was under way!

For the closet interior, I painted the walls the same color as the hallway (Benjamin Moore’s Quiet Moments). I typically go bolder in a closet, but this one is so small that I didn’t want things to become lost with dark walls. As you can see above, we opted to trade the wire shelving for a white wood option instead. Not only do I think it looks more polished, I find the shelves easy to clean and nothing falls through the literal cracks.

The shelves were constructed from a single ¾" thick x 15 ¾" deep melamine board, which were cut to size and rested on 1x2" ledger boards that were affixed to each wall (all purchased from our local home improvement store). To determine a good height, we measured our storage bins and came up with spacing that we feel will be versatile down the road.
I always find that the backs of doors are missed opportunities, and with Container Store’s current Elfa sale, I knew it would save the day with this project. I looked at a few other options (shower caddies, spice racks, etc…), but was nervous that nothing else would work due to the fact that the door has a hollow core (although I have since realized I was wrong about that, more about that in a minute).

For this narrow door, we opted to run the baskets halfway down and finish the bottom off with our small ironing board. The Elfa has an attachment that allowed us to hook the organizer discreetly over the top of the door, ensuring the door would be able to hold a fair amount of weight between the organizer and our supplies. Elfa, I heart you! You can find all of the pieces we used here; one half door rail, over the door hook and four 13 ¾" wide baskets of two different depths.

I had a few spare fridge bins that no longer fit our new fridge, and I knew they would work hard for me (they really are one of my favorite storage items ever, see them in our previous fridge here). Add a couple of shoe boxes to the mix and I was set in the storage department.

In the door, the top basket corrals all of our overflow items from the main bathroom; lotions, balms, sunscreen, etc…
Previously cotton was stored somewhere between upstairs and down, and it was always a game of hide and seek when cotton products were needed. Again, using what I had on hand, I sorted each type into simple mason jars.

If you are like me, you purchase a few extra items when you find a good price/sale. I always have extra bathroom and room cleaners and it is nice storing a couple of extra centrally located between both bathrooms and all bedrooms.

The lower basket holds a few laundry care items. We have always had a small ironing board in this closet, however, the iron was always downstairs with the larger board (why?). I added a small travel sized iron to this closet, for guests and last minute garment touch-ups for the kids. I also added a lint roller and some linen spray.
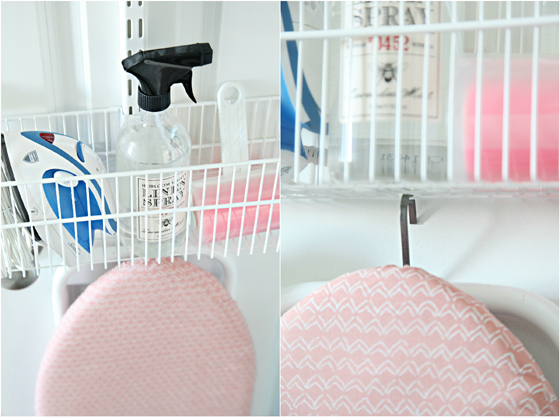
The laundry board hangs by two ’S’ hooks (I added a second one after living with it for a few days), I also added some felt pads to the bottom of the iron board to protect the door from any movement or shifting.

Inside of the closet, those new shelves really did make a world of difference. I love how it actually feels bigger and seems to work smarter. We added a half shelf as high as possible to hold the boy’s secondary towels (we keep one set out and one set laundered).
The blue basket now corrals all of our ice and heat pads, with room for extra paper products next to it.

I added a few shoe boxes because I like they are similar in stacking size to make the most of the open shelving area. I actually had two empty boxes waiting in case we need to modify our storage needs down the road. I always love leaving room for growth when finishing up a project.
And those multi-purpose bins now manage all of our daily vitamins (which were all stashed in a basket in our dining area previously), first-aid supplies and family friendly medications.

These bins are tall and narrow and lightweight and bonus, they are fairly inexpensive and endlessly versatile. I also raided the end of my Martha Stewart bookplate stash to add labels to all of the toiletry and medication bins.
Last but not least, I found this adorable money box which is perfect for locking up and tucking away prescription medications. I just removed the money tray (which doubles as a great mini desk organizer in the boy’s bedroom), and the box can fit about 7-8 bottles.

Speaking of medication, we have always read that they should be stored away from heat (no bathrooms or kitchens), so this hallway closet has always worked well for us. However, I hadn’t gone through our bins in a very long time, and found quite a few medications that were expired. It is important to read this article for proper medication disposal tips. All of our vitamins are now stored here as well, and each week I fill a personal vitamin pack for each family member, which is stored in our individual coat closet drawers.

Time to shimmy and shake and wiggle all around, I always love a good before and after project!


True story? I left the closet door wide open all weekend long.

And that is why I heart organizing. I felt great checking something off of my list that has been there for quite some time, the closet is now far more functional for our fantastic family, and it should be extremely easy to maintain moving forward.
Oh! And I don’t want to forget to mention that there are a few areas in the Elfa bar that offer a location to reinforce the bar to the door. We found some hollow core hardware that made this possible, and it seemed to work really well! We were a little nervous to screw into the door, but the rack isn’t going anywhere any time soon.

One last look so we can celebrate another organizing project in the books? Twist my arm!

from IHeart Organizing http://www.iheartorganizing.com/2016/01/organized-linen-closet.html
No comments:
Post a Comment