As I was sitting and sorting through piles of craft supplies, my dear friend Cassie looked at me and asked, “Do you really love doing this?”
I looked back with a jumbo-sized smile and said, “Absolutely!”
She then questioned, “Even for other people? All of this work and you don’t even get to enjoy the long term benefits.”
I quickly replied, “But that couldn’t be further from the truth. You see, just watching piles become smaller, categories become clear and systems unfold, is a joy that I take with me from each project I work on. The excitement in knowing that someone else is going to have a positively impacted experience due to the time spent rearranging and purging, makes my heart where a permagrin for the following days, months and even years. Understanding the impact an organized space can have on someone when all is said and done, makes it one rewarding job. Now, when do we get to take a break for some more tacos?”

When Cassie first moved into her home a year ago, she texted me a picture of her new craft closet. We both turned giddy at the amount of space she had to work with, which was nothing short of dreamy. The large closet sports double doors that swing wide open to reveal an abundance of space ideal for gift wrapping essentials, craft supplies, sewing notions, photography equipment, office supplies and blog projecting materials.
Although the initial closet came with a basic organizational system previously installed, we both saw a world of potential in the space. Cassie started by tapping into a system that worked in her previous home, a door organized to the brim with gift wrapping supplies, and doubled the idea on the opposite door to include a space to store a plethora of paints and finishes. She shared that story with us here.

Over time, the lack of proper systems and an plethora of unpacked boxes, created a messier closet situation for Cassie and her family.

Given her line of work (cough, blogging, cough), and the fact that her daughter is in love with her daily crafting sessions, it was finally time for Cassie to whip this closet into organizational shape. And can you imagine my excitement when she consulted with me on this dreamy project?! Um, twist my arm Sugarplum!
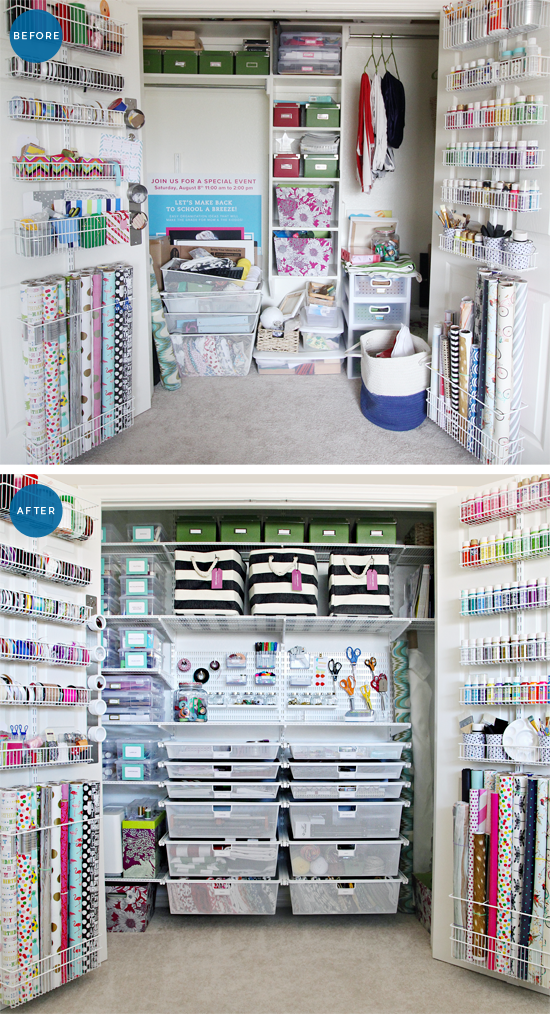
In order to really make this space work for Cassie and her boxes and bins of supplies, she decided to remove the previous system and replace it with a wall-to-wall Elfa from The Container Store.

I mean, can you even? It doesn’t even look like the same closet! The amount of storage space she now had available to her basically quadrupled times fifty and add at least six more high fives. She shared more about the actual installation process on her blog here.
And once the closet was installed, I packed up my suitcase and flew off to Texas for girl time and organizational bliss. Although I could just pile on photo after photo of detailed storage delight, I thought I would talk through the thought process we went through while putting the finishing touches on this craftastic space.

STEP 1: ASSESS & PLAN

Cassie had a really good idea of what she had waiting for her inside of the bins, baskets and boxes that still needed to be unpacked. She also knew that her previous closet system just was not doing a great job of maximizing her closet walls to the fullest. She was able to meet with a specialist at The Container Store to put together a design that would offer her years of flexibility. The beautiful thing about Elfa is that it is on a track system, allowing every last component to be moved and swapped as needs change. Cassie went all in by pairing large drawers with rows of shelving and a wall of pegboard. It really gave her a great base to start with, and thanks to the flexibility of the system, we were able to make a few slight modifications as we moved forward with the project.
STEP 2: SORT
We didn’t even take time to get out of our pajamas for this part as I believe it is important to be happy and comfortable while we work. Although this step is mostly self explanatory, we took time to go through every last item in Cassie’s piles. I asked her the “keep or toss?” questions while also writing down a list of general and more specific categories that were naturally forming as we went. An example of a general category would be sewing; while more specific sub-categories of sewing would be fabrics, mediums, dyes, tools, etc….

Now, let’s take a second to chat about craft supplies. The thing is, once you buy a supply for a specific project, you almost always have leftovers of that supply to store. Those leftovers can quickly grow and grow over time, especially when your job causes you to reach for them on a frequent basis. And if you have kids, you may find endless benefits in keeping a well stocked craft closet. While sorting, there were many supplies which ended up in a discard pile. Those items can now be donated to local libraries, schools, churches, shelters, care centers and donation facilities. The remainder of Cassie’s crafts were broken down into those specific categories I mentioned above.

STEP 3: CONTAINERIZE
After the items were sorted into each category, I wrote down the category and we talked through the best bin/container option for each. We used many of these principles while making our decisions. We talked about the amount of each category to be stored, frequency of use, placement in the closet, etc…
Cassie already had quite a few smaller containers that she had acquired over the years, which we took inventory of and utilized throughout the project. However, she did make a couple of purchases to be sure her supplies could adapt to her new closet setup.

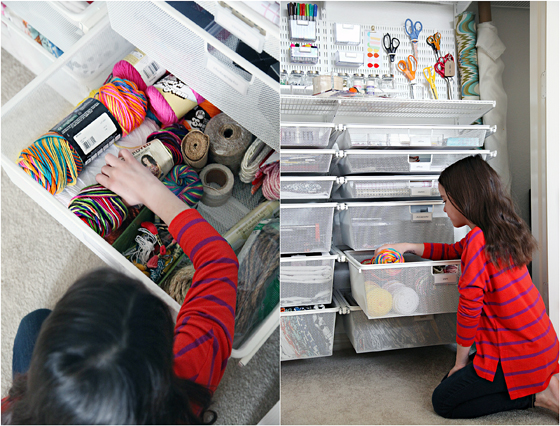
For the majority of the smaller crafty items, we found ourselves loving these clear shoe boxes. Did you know you could purchase an entire carton at a time for a slightly discounted price? And after using these clear shoe bins for this project, I may never reach for another. #amazingquality Not only are they clear, making it easy to see contents, but they also stack beautifully and offer a clean and simple appearance. We also used some over-sized rugby bins for concealing the clutter of larger project based items and table setting props. Everything else went straight into Elfa drawers and components.
STEP 4: LABEL
Because much of the storage throughout the closet is clear or easy-to-see and access, we originally thought we would be off of the hook with the need for an abundance of labels. However, because those clear bins stacked and many were placed on higher shelves (making it nearly impossible to see the contents), all of the clear bins received labels. And you know that darling daughter I have mentioned a few times now? The girl LOVES crafting with her mama’s supplies. In fact, this is just as much a closet for her.
Once you add multiple people to the mix, the chance of things making their way back to the same place twice, is reduced significantly. Labels keep everyone on the same page, so we decided to just go hog wild with labels galore.

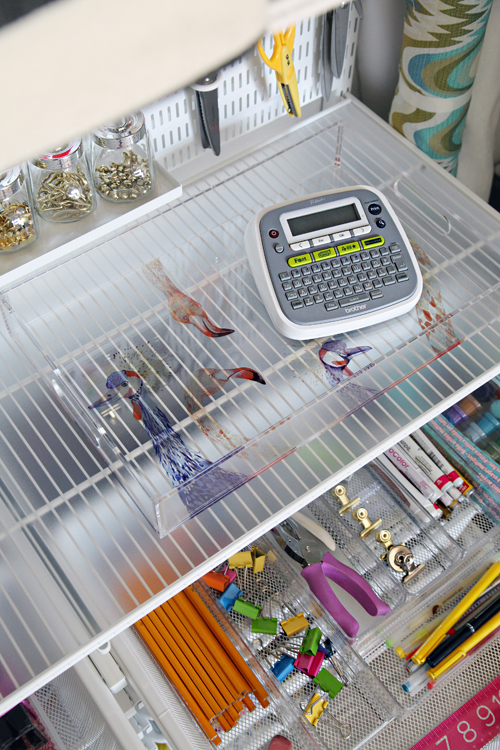
For the plastic bins, we found some new adhesive label holders at The Container Store (adhesive also meaning: simple). We liked that they covered much of the face of the bin and offered a generous area to create large lettering, ideal for reading the bins placed up on higher shelving.


Elfa offers specific labels that clip to the drawers and bins with ease, so we went the easy route with those and put them to work as they were intended. The best part is that they pair perfectly with label maker tape.

And for the rugby bins, I created labels using Pages on my laptop and pasting them to some thicker cardstock gift tags Cassie had in her stash. A little ribbon later and the purple tags were stealing the entire show.

Quick Tip: Also use labels to act as friendly reminders. Cassie knows that there are a few pair of scissors that should only be used with fabrics, but that is not something her nine year old thinks about in the spur of the moment. A happy little label tag should do the trick of reminding her which scissors are off limits.
STEP 5: PUT IT ALL AWAY


The final step was to put everything away in the new closet. We talked a lot about the types of supplies she finds herself reaching for on a daily, weekly, monthly and less frequent basis. We started with her sewing machine, which was bulky and one of the larger items she needed to store. Not only is it used from time-to-time, it is also too heavy to store up high.

Above the sewing machine, clear bins were stacked. The items used frequently (adhesives, punches, etc…) were placed at Cassie’s main level while less used items went on the upper shelves.

The drawers were great for holding bulkier items, such as stacks of fabrics and photography equipment, along with Cassie’s office supplies. Inside of the drawers we were able to make the most of the large area by adding many smaller bins and boxes that Cassie already had on hand from her last craft closet.

Thanks to the adjustable shelving, the jumbo rugby bins take center stage and remind Cassie that she has some future blog projects to tackle. The green boxes above are also from her previous closet, and are currently empty and ready for any overflow items that she needs to temporarily store.

The far right of the closet was left open to accommodate tall bolts of fabric, photography boards and lighting kits.

And of course I wouldn’t recommend anything other than clear acrylic magazine files to hold Cassie’s impressive stack of publications that feature her awesomeness.


Can we take a minute to just ooh and ahh over the pegboard? It offered additional flexibility for Cassie’s most frequently accessed supplies. Have you seen her work pom-pom magic yet? If you know her, you will understand why those are hanging out front and center. The pegboard system allowed us to add a combination of hooks, bins and shelves, giving us quite a few options to select from for each type of craft being stored in this area of the closet. So much versatility, I can’t even articulate my over-the-top excitement any longer.
A FEW MORE TIPS:

We added a tray to the station so that Cassie can load up supplies, take them back to her desk or downstairs to photograph, and easily return them when she is done. The tray is pretty enough to remain camped out on the work surface in-between sessions.

Maximize your closets by utilizing all area from wall to wall and ceiling to floor. Don’t forget the incredible amount of space also offered on the backs of doors. Bonus points are given for utilizing a closet system that can be adjusted and modified as needs change.

Add thick lining to metal shelving to create a work surface that doesn’t allow for small bits and pieces to fall through the cracks. It also acts as a nice spot to pull the bins to while selecting project materials.

Consider the benefit of cohesive storage. What really makes this closet work for Cassie, is that the storage is streamlined and unified. The clear bins stack together and all sport the same labels, the previous green bins line together and conceal smaller random clutter, and three rugby bins hold larger items (versus random bins and boxes spread throughout). When it came time to label, we also considered the colors that were being used, and they all played off of other areas of the closet. For example, the purple tags on the stripe bins pick up the color from the floral bins near the floor. Craft supplies can be very busy on their own, so streamlined storage solutions can really reduce additional eye confusion. Random, smaller leftover storage pieces work great inside of the drawers and larger bins as dividers.


Last but not least, if it is not broken, don’t fix it. The door system Cassie installed months earlier was working just as she hoped, so it didn’t require much attention beyond a few small container swaps. There were a few other times in which Cassie already had a system down to a science, and we were able to trust that our efforts were better spent on areas that hadn’t been addressed yet.
I don’t know that I have ever had this much fun working on a project before. We laughed hard and frequently, yet also found ourselves in the throes of deep and meaningful conversation. We ate delicious food and listened to music from a variety of genres. We sorted and labeled and organized while sporting our coziest clothing. And when all was said and done, we spoiled ourselves with a massage and more tacos. 100% my idea of a dream date. In fact, I am thinking of starting an organizing workshop that includes taco eating, pajama parties, 80’s music and endless sorting and label making sessions. Am I the only one who would have fun at something like this?

I can’t thank Cassie enough for inviting me to work with her on this project, and for hosting me for a few very appreciated days away. Organizing is always fun for me, but nothing compares to doing it with someone I click with so well. On the last day, I caught her just standing in front of her closet smiling and gazing at all of the loveliness, and it solidified my response to her when she asked about the joy I get from helping others with their spaces.
If y'all have any questions regarding additional product supply sources spotted throughout this post, be sure to head over to Cassie’s blog for even more project details.
from IHeart Organizing http://www.iheartorganizing.com/2016/02/the-ultimate-craft-closet-organization.html
No comments:
Post a Comment