I always find it amusing and interesting that as the seasons change, I tend to receive the same types of questions from multiple readers. Recently, the question has been, “How do I label canvas bins?”.
I have received this question here and there over my years of blogging, but canvas bins must be totally hot right now because the question has popped up multiple times in the last few weeks. That’s my sign to finally answer this common question with another chapter to my labeling 101 series.

It is no secret that organizing and labeling go hand-in-hand. It is also no secret that I love to share my labeling tips with you. That is how the Labeling 101 series was born.
Does organizing have to be pretty to be effective? Absolutely not. But I always say, “Why not love it, have fun with it, and find ways to keep yourself motivated?” Any time that I have invested a little extra heart and attention to a project, it lasts much, much longer.
That said, when it comes to labeling, I prefer to add a little ooh, la la value. Whether it be a label made on our computer, or placed inside of a decorative bookplate or even created with my label maker, I want it to stick around for awhile and look the part. Labels keep everyone on the same page and really are a crucial part to most organizing projects.
So how do you label canvas bins? And do it quickly, easily and with a little pizazz? I am sharing four different darling options with you today, and with that I am only scratching the canvas surface.

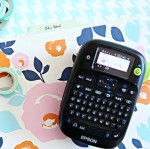
To get started, I whipped up a few label options using my printer, and one cut with my Silhouette machine out of heat transfer material.

I picked up a standard canvas bin with a small grommet handle from Target. Although there are an endless variety of canvas bins on the market, most of these techniques should be fairly universal.

First up, name badges! I found a small pack of these at our local office supply store. They are clear and this specific type had a safety pin affixed to the back.

I created a label on my printer, cut it to fit the holder and pinned it directly to the front of the canvas bin.

I really like this option due to the flexibility and the fact that it is couldn’t be easier. But I wouldn’t recommend this option with littles, just given the fact that it is attached with a safety pin and I don’t find those to really be all that safe.
__________
The next label I created using my print, cut and laminate tutorial, which is always a much more kid friendly version.

Canvas bins work great for children’s toys, and so do picture labels. For this label, I used a hole punch paired with a piece of baker’s twine. I then affixed it to the bin through the small handle by tying the twine into a simple knot.

These print and cut labels tend to be my favorite because they are completely customizable and easy to make using supplies I always have on hand at home.
__________
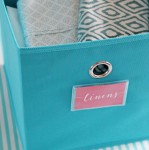
You all know I am a long time fan of the Martha Stewart Adhesive Labels (which are now back!), so image my excitement when I spotted a similar version at Target.

These holders are designed to slide over the edge of bins and boxes, creating a quick and non-permanent labeling solution. And again, I opted to print the label using my printer (because I am not a fan of my handwriting), however, you can quickly write out your label or use a label maker paired with tape. Whatever tickles your fancy folks.

__________
Last but not least and the trickiest of them all; the iron-on heat transfer.

I used this type of label in our boy’s bedroom closet, and they are still going strong! However, the application can be a bit of a hassle. The iron-on heat transfer material is found online and at some craft stores, and cuts beautifully with the help of a die cutting machine. However, if you don’t have a craft machine, don’t fret! This material can easily be cut with a simple scissors as well. I would just recommend keeping the outline/shape fairly basic. For this pet bin example, I decided to do a cute cut-out of a balloon animal. I followed the heat transfer directions and used my iron to adhere the label to the front of the bin.

I have learned after doing this a few different times that not all canvas bins are created equal. The inexpensive canvas bin shown above has a thin webbing finish, which can melt if you keep the iron on the canvas too long. You definitely want to do this with a thin cloth as a buffer. On the other hand, the transfer doesn’t want to stick if you don’t hold the iron down for long enough, So it is all about striking that perfect balance. But gosh darn it, I had to include this method because it does create a stinkin’ adorable label and you may find it worth the little extra time. And if you use a canvas bin that does not have a webbing finish (similar to this one or this one), then you shouldn’t have too hard of a time with this method at all.
__________
So there you have it, my favorite four ways to label a canvas bin. Working on this post made me realize just what a label lovin’ fanatic I am. OK, so I already knew, but it was so much fun to get back into the label-making game. And if you are looking for more label inspiration, you can find all of the posts in this series shown below.
 |
 |
 |
 |
 |
from IHeart Organizing http://www.iheartorganizing.com/2016/03/labeling-101-canvas-bins.html
No comments:
Post a Comment