When I recently posted about my current office setup, I shared some of the thought process as well as the space planning diagrams I utilized. I have been using Microsoft Excel to put together space plans and diagrams for many, many years now. In fact, I recently stumbled upon a post from five years ago in which you all asked for a tutorial. And another in February when I shared some little lady closet plans in this post. I even used it to put together our home’s floor plan shown in our home tour tab. So although this post is WAY overdue, I have been hesitant to share this tutorial for a few reasons. First, I am not sure this is the most effective or quick way to create space plans (OK, I know it is not). I have been playing around in Excel for about ten years, so it is quick and easy for me; and it takes me less time to use it than to learn a whole new program meant for this specific task. Secondly, this post is about to get lengthy. There are a lot of different options and steps that can be used, so I wanted to share as many shortcuts and quick tips as possible in a single post. I should also note that I am doing this tutorial with my Mac; however, I believe many of the steps also apply to Windows (although it has been awhile so I apologize if there are any major differences). Let’s get started.

Okay, so the entire goal is to do some general space planning. I like to look at it like digital graph paper. The first step I take is to create a grid of even squares out of the worksheet cells. Once you open a new workbook, select all of the cells and adjust the height and width to an even size. For this example, I selected .10 inches for both the height and width.

You will want to use the grid to assign a mental measurement for each square (your graph to real life scale). If I am doing a single closet, I might assign an inch to each square. If I am doing a whole room or floor plan, I might assign 6" or a foot to each square. It all depends on the desired accuracy and size of the end result.
I am going to put together an entryway closet plan for this example. The made up closet is 4 feet wide, 2 feet deep and 8 feet tall. I quickly convert all general measurements to inches, and jot them down on a scrap sheet of paper.
To create the outline of the project, I begin by selecting a single cell and holding down the Shift key, arrowing over the correct number cells to equal my total inches. The mouse can also be used to select and drag the cells to highlight.

There is no need to count each individual cell; you can see how many cells are selected in the upper left corner of your workbook. If you begin to select enough cells and they are no longer all on the visible page, your number selected will move down to your workspace.

You can border/outline these cells two ways; by clicking the border selection dropdown from the home menu bar…
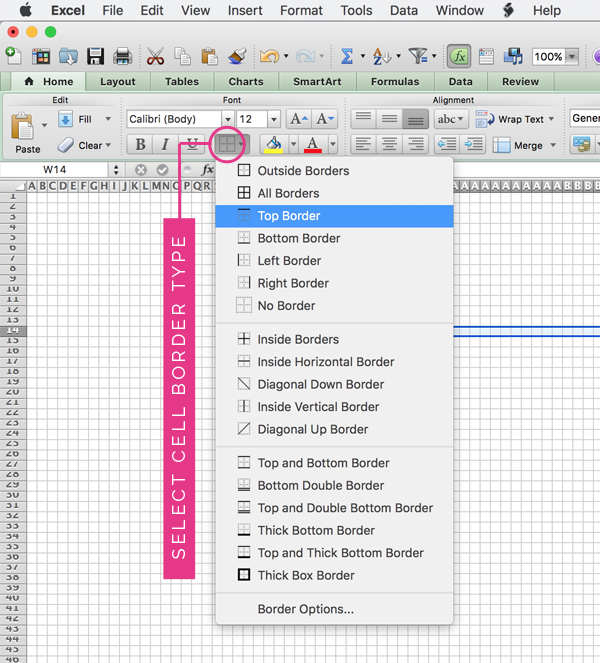
Or by right clicking the highlighted cells and selecting Format Cells.

This pretend closet is four feet wide, but has a door opening of 30", so I illustrated the opening with a different border style. I like to select a variety of border styles to highlight specific areas/wall types of the plans.
Once I have the main outline determined and scaled/drafted, I begin sourcing additional features. For example, I would recommend shoe cubbies that can also double as a bench inside of this closet. I found a piece of furniture online that would fit the four foot space, and using the product dimensions listed on the website, I was able to begin adding it to my design. You can be as specific or generic as you wish when preparing the plans; I like a little detail to identify my ideas. The copy & paste function allows me to quickly add those repetitive details.

One of the reasons I love going through this exercise, is because it really forces me to think through product purchases and space measurements. In this coat closet; I would add a rod above the shoe cubbies, however, my initial attempt didn’t leave enough room to hang a bulky winter jacket.

I found this website to be extremely helpful when space planning closets, and it told me I should provide 40-44" for hanging outerwear (vs. the 38" in my initial design above).
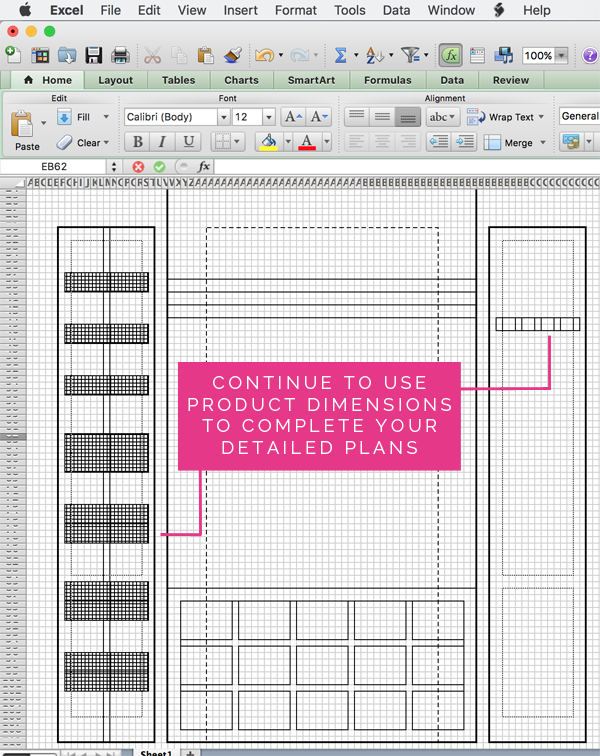
I continued to source product to complete the design; an Elfa system for one 15" door and a utility organizer for the other. I can now be fairly confident that everything should fit because I have triple checked dimensions and have been forced to pay attention to detail as I transfer the product to the plans.
If you are using this for solely for your own ideas and plans, you may stop at this point and feel good about starting the real life project. Because I present a lot of these ideas to others, and here on the web, I take things a bit further.
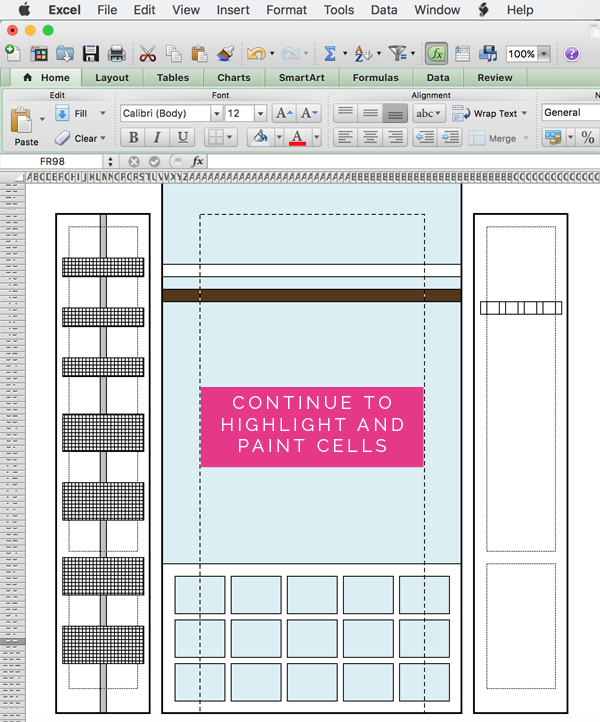
To clean up the design, I fill the entire page with white.

Again, to differentiate areas of the design, I fill cells with a variety of color. For example, the inside of the closet could be painted pale blue and the hanging rod can be stained a wood tone.
When it comes to any specific prop items, you can either insert a graphic, image/photo, or a shape.

When I look at the types of objects I tend to add to these designs (storage boxes, baskets, cleaning supplies, etc…), I visualize everything in shapes.

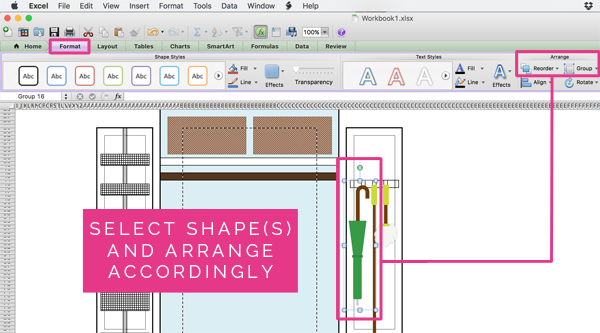
Once the shapes are added to the workbook, they can be formatted down to the color, line style and thickness, size and even shadows. Just select the specific shape you wish to format (or hold down the Shift key to highlight multiple shapes at once), and make changes using the tools available in the Format tab.

You can also change the order of these floating shapes, or group them together to create a single object.
After I have played enough, I have my first view of the closet design.

Still not done! I like to have a few different views of the design to share, but because I don’t want to lose the current view, I make a copy of it.

Select the current worksheet tab at the bottom of your project, right click and select ’Move or Copy…’. It is important to select ’Create a Copy’ when the option box appears.

Now you can make some additional adjustments without having to completely replicate all of your work from scratch.
For the second visual, I wanted to show the outer walls of the closet, and create some text to point out specific product details.
Text can be added by going to the Insert menu, and adding a Text Box.

Once you type the text, just as you formatted your shapes, you can make similar changes to your fonts and text boxes. I also like to add in arrows to really call out the products.

Quick Tip: The arrow lines will automatically connect from your font box to a shape, but not to a general cell. To get the exact line shape you are after (I like arrows with a good swoop), add another small shape to act as a connector where you want your arrow to end, and then delete it once your arrow is in place.

For the last visual, I like to provide specific dimensions of key components. Again, I start by creating a copy of my workbook, and use the Text Box and Shape features to accomplish this.

Lastly, I do a lot of copying and pasting whenever possible, especially with fonts and arrows. Another really helpful tip to speed up the process is to utilize the Format Painter tool. The Format Painter tool allows you to quickly apply the same formatting, such as color, font style, size, and border style, to multiple pieces of text or graphics. Think of it as copying and pasting for formatting. To do this, simply select the cell, shape or text box you want to replicate, then click the paint brush button at the top of the screen. Now click the new item that you want to take on that formatting, and it should instantly update accordingly. Try it a few times, you will fall in love!

Another way to do less busy work, is to set a default line style. Once you have formatted one line (or arrow), select it, right click and then choose ’Set as Default Line’.

Maybe it is the creative in me that gets all geeked out about this type of thing, and could get lost in it for hours. I have been using Microsoft Excel for spreadsheets, charts and project planning for so many years now, and yet I still learn new tricks every day. The little ? at the top of the screen is clicked on often here, and it is how I have learned everything I know. What I love most is that I really can be as creative as I wish, and I don’t need to purchase or learn expensive software to whip up an idea.

I have just begun to dabble in Google Sketch-up, and if I can master a few basics, I will be sure to share that experience as well. Feel free to let me know if there was anything that I glossed over; I am sure there are a few details I may have missed but I am happy to answer additional questions below.
So what do you say? Are you ready to give this digital graph paper a try?
from IHeart Organizing http://www.iheartorganizing.com/2016/07/how-to-plan-project-using-microsoft.html
No comments:
Post a Comment