Whenever I am a little stressed out, I turn to organization as my form of therapy. I have always found it to be a relaxing exercise; and every time I finish a project I feel like I go from from overwhelmed to proud and excited. And who knew anyone could feel that way after spending a few minutes tackling their cord situation?

If you would have told me that this project was going to make my heart go pitter-patter, I would have laughed and maybe even thrown a good eye roll your way. In fact, I have been putting off this little organizational task for far too long, because I was sort of dreading it. Organizing cords doesn’t tend to provide jaw dropping before and afters after all.
But you know what? This little organizing project was instantly rewarding and gratifying. We have fallen victim to the digital world, and with that we have accumulated cords in massive quantities. USB cables for our computers, scanner and camera, charging cords for our video game controllers, battery cells, bluetooth speakers, iPads and phones, as well as power cords for small electronics such as my craft machines, photo printer and external hard drive. It came to a point where I didn’t know what cord went with what device, and even worse, they were consistently tossed into one of two bins and it created quite the jumbled mess.

I am all about keeping it real, so I am going to go ahead and pretend that the images above are no big deal. And I definitely don’t feel ashamed that we couldn’t maintain this fantastic little setup I created a few years ago. #sigh

We actually did maintain the above cord organization fairly easily for the first year or so, but I made a small mistake the first time around with the labels I selected. As we swapped out devices and our electronic inventory changed, I wasn’t able to easily update the slot labels (or expand on what we already had). After I attempted to remove a few of the labels, the paper started peeling and after another year the box dividers had lost their structure and good looks. I continued to use the boxes for cords, but the mess eventually took over.
As I considered whipping up a few new dividers, I realized that my problem was more in the labeling than the separating. I decided that the labels would serve me better on the actual cords vs. inside of a divided box.
Before I got started on my labeling, I went through each room in our home and gathered every last stray cord. This was a really important part of the process, as I find it to be much more beneficial to tackle a single category all at once vs. working room to room and dealing with a cord problem time and time again. From there, I sorted them down and wrapped them with cord ties. There are endless cord wrangling supplies on the market, but there are a few key organizers I find myself going back to frequently.
 |
| paper towel roll | velcro | cable tie | cable clip | rubber bands |
PAPER TOWEL ROLL - Just cut down the cardboard paper towel roll to your necessary size, cover with a piece of cardstock and you have yourself some sturdy (and darling) cord storage.
VELCRO - These little wraps are ridiculously handy, inexpensive and easy to use. They also come in a variety of colors and sizes which is a nice bonus.
CABLE TIE - I also love these little cord helpers, but they are a little pricier. I attempted to use a paperclip in a similar fashion and it definitely didn’t work as well. The rubber coated wire protects your fingers and cords and they are easy to bend. These ties also come in a variety of sizes and colors.
CABLE CLIP - These are the perfect size for standard iPhone and iPad charging cords, and always look nice in any drawer or pouch.
RUBBER BAND - Because sometimes cords are bulky and just a wrap or two of a rubber band is all that is needed to take control at no cost.
I already had a few cable ties on hand, but knew I would need to up my wrangling game so I picked up three packages of the Velcro wraps (on sale for $2.69 for 10 wraps at JoAnn). They made it easy to control all of the different cord types and sizes.


When it came to labeling the cords, I knew I wanted to label the cord directly. I also wanted to select a label that is easy to read and will last over time. Washi tape and a label maker is a good option, but not all Washi is created equal and the busy pattern on many of the tapes can make it hard to read the label. So this time I turned to a couple rolls of vinyl that I already had on hand. I used my paper slicer to cut a few strips, I liked that it was adhesive (but not permanent) and the colors would still allow the labels to be legible.
 |
| my favorite label maker |
I simply cut the strips to size and wrapped them around an end of each cord. I then printed a label (onto clear label tape) and wrapped that over the top of the vinyl.


At first it wasn’t intentional, but I quickly realized it worked out well to use pink for any cords that belong in my office, and the tealy blue for all of the family specific cords. The common cords and chargers were tossed into a box to be stored in our movie cabinet.

For now, a small basket holds all of my bulkier cords for my office electronics, and a clear pencil case worked well for the smaller, more frequently used cords.


I actually used the pencil case to create auto boxes for our boys this summer, and they have been awesome (especially during our 24 hour road trip). Each boy has a box with their headphones, device charger cord and car adapter plug.

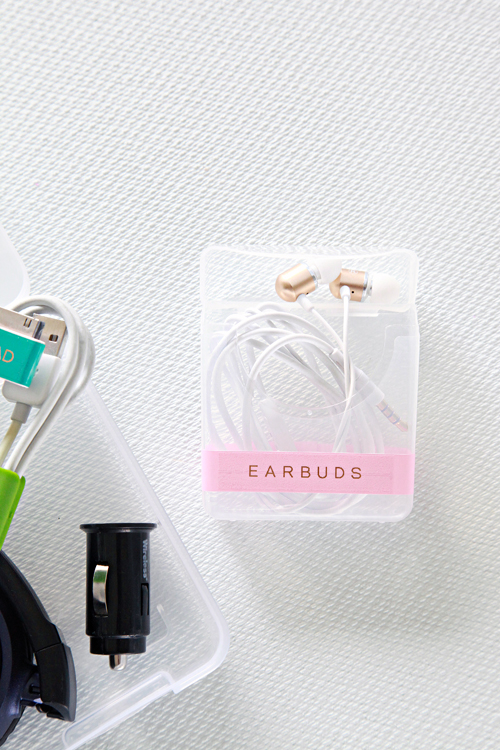
And I still stand by my favorite earbud case on the planet; a travel size cotton swab case.
And just when you thought that I couldn’t possibly have more cords to wrangle and organize, you would be wrong. Can I get another #sigh?

I don’t know who works at that desk but it certainly wouldn’t be a 5'1" blonde gal named Jen who writes an organizing blog. Nope.
OK, fine, I admit it. It’s my desk. You got me. But I still don’t know who the cords belong to or how they got there. #iclamethefifth

The cords looked a little intimidating, but it was nothing that some Command Hooks (designed specifically for cord control) couldn’t handle. I ended up using both the smaller Cord Clip version and a larger Round Cord Clip option. These were perfect for holding all of the cords up out of sight on the underside of my desk (which is also where the power strip is affixed).

Not the prettiest view but it doesn’t matter because I can’t see it! Wahoo!
I used a couple of the Cord Clips behind my Mac as well.

I was never a fan of the wireless keyboard that came with my computer, so I added a USB version. I like the full keyboard much better, but the cord needed some wrangling so I could keep a clear work surface. This little pink cord holder worked great, and another Command Hook on the back of the monitor holds the extra cording up and out of the way.

Just a few minutes of time made such a difference!

This project reaps such tremendous rewards, not just for myself and my workspace, but for the entire family. No more confusion over what cord belongs to which family member, or pairs with each type of device. And to be sure I wouldn’t have a hard time maintaining this system this time around, I used a small clear pouch to hold all of the extra cord organizing supplies (and tossed it right into the storage box with all of the cords). I even cut extra strips of vinyl so all I need is the pouch and my label maker and any new cords will quickly be identified.


Do you have any organizing projects you have been dreading? Or have you tackled one that wasn’t so bad after all? What is your favorite form of stress relief?
from IHeart Organizing http://www.iheartorganizing.com/2016/09/cord-organization-tips-tricks.html
No comments:
Post a Comment