
Our son took over the guest room just before school started this past year, and with that move he inherited a double closet. Because he is only ten, we liked the idea of keeping one side for studying and utilizing the other side for storing his clothing. By doing this he now has plenty of open floor space to spread out and play and to make forts and to have sleepovers… You know, all of the important things every little guy loves to do in their bedroom.
The closet area was slightly complicated only because it is wide open to the other side (his workspace), and the previous setup didn’t allow him to easily organize and store all of his clothing. Up until now, he was using bins under his bed for many of his folded pieces, as well as small cubbies and wire shelves in the closet. I absolutely couldn’t wait to install a long term solution that can handle all of his clothing now, and when he is 18, and when the room goes back to guest room status again someday (but let’s not think about that).
Here is a reminder of how the closet was looking at the beginning of the month….

The first step to this project was to assess what was not working well. That included a lack of drawers/concealed storage, a lack of accessibility for our little guy, no designated systems, no access to the top shelf due to placement, no hamper… We also were not a fan of the overall layout, the metal wire shelving or the floral wallpaper that was still installed. We did like the stackable cubbies, and the fact that they offered that internal divide between the workspace and clothing closet, but we didn’t love their placement in terms of fully utilizing them.
The overall dimensions for this side of the closet are about 4’ 6" wide by 2’ deep. The goal was to add towers inside of the closet to define the clothing area, while also offering our son both hanging and drawer storage.
After researching a few closet options and layouts, we ultimately decided to partner with ClosetMaid on this project. I have utilized ClosetMaid components in multiple closets and spaces throughout our home and we have always been happy with the mix and match customization options, as well as the overall quality. I went straight to the ClosetMaid website to begin looking at all of their available closet specific configurations and spent many hours designing multiple storage variations before landing on a final plan.
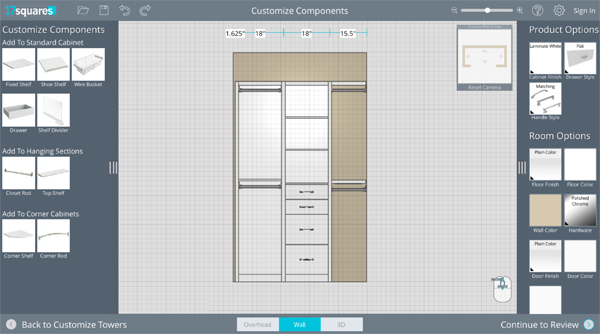
Depending on the specific collection you select, ClosetMaid offers design tools online that allow you to input your walls and measurements, and then play with their product configurations. My problem-solving self loves this aspect of any organizing project, but if you are feeling a little lost, they also offer a new free design service. Once the design is settled, the program generates a shopping list that includes every last part and trim piece that you can then add to your online cart. To check every last wish list item off of my list, I decided that the SpaceCreations line was the best fit for our needs.
Here is another look at my overall vision and plan for the final closet.

Once the boxes arrived holding the closet components, we began the process of removing the previous wire shelving, stripping the wallpaper, priming the walls and installing the same Walls Need Love peel and stick paper we used on the desk side.

I love that this specific pattern is forgiving due to the organic watercolor paint splotches, it was probably the key to the paper going up in just a couple of hours.

We wrapped the entire interior of the closet to really finish off the look throughout.

Above you can see the closet during the installation process. We assembled the two towers first, which were ultimately anchored into wall studs. At this point, it is really important to leave a small gap for the decorative trim pieces that are provided to give the units a more polished look.
The assembly was quite simple; although we know our way around a drill and hammer, any DIY beginner could definitely tackle this particular project.

A huge parent and kid win is the fact that the drawers are all installed on soft-closing tracks!

I also love that ClosetMaid offers a few drawer organizing options specific to their drawer sizes. Do you see what I see? Oh yes, those are acrylic! #oohlala

The two towers offer future flexibility because they are pegged from top to bottom and accommodate rails, shelves, and drawers. For now, I added shelves down the center to hold some baskets and smaller belongings, however, this area can easily turn into additional hanging storage as our son grows and his needs change.

Above you can also see how those trim pieces that run down the sides and along the top of the unit really finish off the entire closet.
Ready to watch it all come together with our son’s belongings?

Let’s back up for a moment. A huge part of the planning and putting things away process is to actually touch every last thing and purge down anything that no longer fits, as well as items that were worn thin or had any holes. Our youngest son receives quite a few hand-me-downs from both of his older brothers, as well as family friends with older boys. We realized that he had more clothes than he really needed and that he was also holding on to quite a few items that no longer fit him well.

Also, let’s be real for a second. I naturally put everything away nice and neat to celebrate and reveal the new closet to our kiddo and to you blog pals. In fact, I realize that quite a few of my over-the-top habits of arranging items but color, folding things in specific ways, smoothing things out and pressing wrinkles, will quickly be undone as the closet is used full time. I am fairly sure that this setup will be extremely simple for our son to maintain, but this is probably the tidiest it will ever be. #truth
I reused Parker’s previous slim hangers, which provide him with plenty of hanging space for all of his pants, long sleeve, short sleeve and dress shirts. We were actually able to maximize his pant hanging space by adding some hanger clips which just clip to the hanger and the pant to allow them to hang straight (vs. folding over the hanger and doubling the amount of space they take up).

One of the biggest problems we had with the previous closet arrangement was that our son couldn’t reach the top hanging shelf. It was installed too high and most adults couldn’t get near the upper hangers without help. Our little monkey would love to climb if we were to give him permission, but I decided to purchase him an extending hanger-hook pole, which just hangs on a Command Strip inside of his closet.

This was such an easy solution to maximize that vertical space while also preventing our youngster from climbing. Another parent and kid win!

We made sure the top of the hamper could flip open and placed two shelves above it to hold a few pairs of shoes.

I know you all want to see those acrylic organizers doing their thing, so I won’t keep you waiting any longer!

This just might be my favorite spot in the entire closet; it is pure eye candy for sure. Ten pairs of rolled shorts! You hear that summer? We are ready for you!
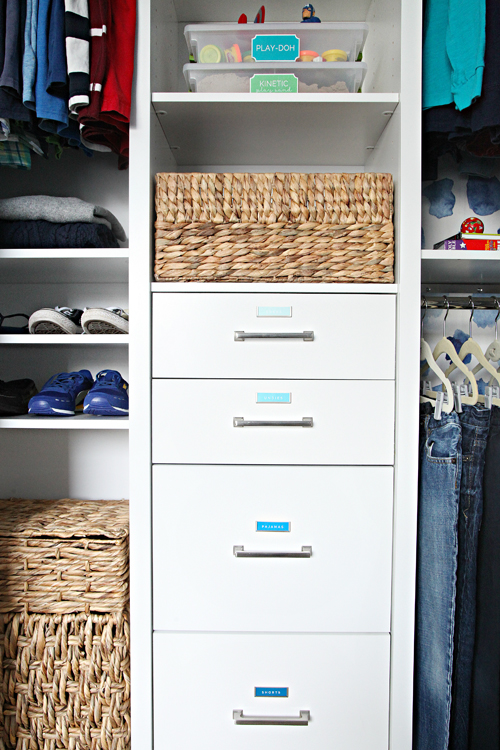
Next up is his new pajama drawer…

And above his undie drawer is a shorter drawer that I wanted to use for belts and socks. An inexpensive flexible drawer divider keeps everything sorted and makes for quick mornings.

I added adhesive label holders to the drawer and printed off the colored inserts which I made using Pages on my computer.

I couldn’t resist a quick video with our son opening and shutting his drawers. I told him to just be himself and not to take it easy…
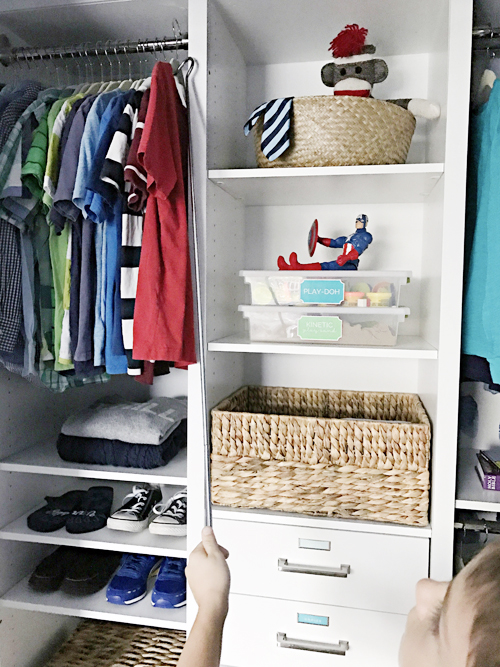
The lower basket is designated to t-shirts, athletic wear, and swim trunks.

And the basket on the top shelf collects random belongings like ties, toys and his overnight sling bags.

We have always stored linens and bedding in their actual rooms (vs. a central linen closet), and there is plenty of space remaining on the very top shelf for extra blankets and pillows. And because our closet is two feet deep and the system is 15" deep, we are still able to easily add and remove items without running into any spacing issues.
We have been planning on installing some french doors to the closet, but I am in no rush to cover up this handsome install.
Now that you have seen how I put this closet to work for our son, let’s get giddy about the before and after and go gaga about all of the added storage and functionality!

PRODUCT SOURCES:
Closet System (c/o) | Acrylic Drawer Organizer (c/o) | Hangers | Hanger Clips | Extending Hanger Pole | Hamper | Label Holders | Storage Baskets | Sock Organizer | Stacking Bins | Wallpaper


A huge Thank You to ClosetMaid for partnering with me on this post!
from IHeart Organizing http://www.iheartorganizing.com/2017/02/before-after-organized-boys-bedroom.html
No comments:
Post a Comment